
This page documents MIN Test Framework
Copyright © 2008 Nokia
Document Version 1.3
Online copy of this document (recent): http://min.sourceforge.net/doc/min-reference.html
Documentation download page: https://garage.maemo.org/docman/?group_id=853
Project home page: http://garage.maemo.org/projects/min/
| Version | Date | Status | Comments
|
|---|---|---|---|
| 1.0 | 17.12.2008 | Draft | Initial draft
|
| 1.1 | 20.01.2009 | Draft | Added chapter describing C++ modules
|
| 1.2 | 01.02.2009 | Draft | TeXinfo version draft
|
| 1.3 | 24.02.2009 | Draft | Complete TeXinfo version
|
Code, commandline input and output is written with the fixed-width font.
This chapter describes how MIN can be used for implementing test cases.
A test module contains the actual test case implementation. Test modules are implemented as separate libraries that MIN dynamically loads. Test modules can be freely implemented, as long as they implement the test module API. Test module can be Hardcoded, normal or MINUnit. These test module types can be seen in figure below.
Test modules are indicated with bolded font.
Test Module API is a user-friendly API for test case execution
A test module has to provide the following interfaces to MIN:
These features are provided by the Test Module API that the test module has to implement in order fulfill MIN test module requirements.
In addition, there are some optional features that are offered by the MIN services API. MIN Services is interface from the test module to MIN Engine. For example, the interface offers UI independent printing functions, which can be used to show the test case progress on the screen, if there is a screen available (e.g. the console screen with the MIN Console UI application).
The tm_get_test_cases function is used to query test cases from a test module. The test case file is provided as a parameter (optional). This method is called for every test case file separately
The tm_run_test_case function is used to execute a specified test case. The test case file is provided as a parameter (optional). The method returns the result of the executed test case.
The tm_initialize function is called once, when the test module is loaded. Function does not take arguments and does not return any results. It is not mandatory to implement it.
The tm_finalize function is called once when module is closed. Function does not take any arguments and does not return results. It is not mandatory to implement it.
The API functions provided to the test module provides optional features to the test module:
The printing mechanism is based on asynchronous requests. Test process can send a printing request for TMC, which forwards request to UI.
Within MIN, there is a specific MIN Test Module Template Wizard for automatically creating a test module template, for example, a Hardcoded test module, based on the templates.
The test module template type can be hardcoded, normal, testclass or minunit. These test module template types can be seen in figure in Using MIN for test cases implementation. In the figure, the test module template types are indicated with cursive font. The figure does not contain detailed information for each test module; for example, the test case files are not shown. In addition to test module templates, the template wizard can be used to create test class templates used by MIN Using Test Scripter for creating scripted test cases or Lua Using LuaScripter for creating scripted test cases scripter.
MIN Test Module Template Wizard can be launched by running the createtestmodule script.
MIN Test Module Template Wizard takes the test module template, makes a new copy of it, and changes all the Test Module specific definitions (names) in the code files. MIN Test Module Template Wizard asks from the user the test module template type and name, as well as the path where the new test module template is created.
The test module template type hardcoded creates a test module template where every test case is implemented as a separate function.
The test module template type normal creates an empty test module template where the test cases are implemented under the tm_get_test_cases and tm_run_test_cases methods.
The test module template type minunit creates MINUnit type of template.
An example of the test module creation process is shown in Example below
     user@ubuntu:~$ createtestmodule
     Enter ModuleType:
     	normal = creates an empty test module.
     	hardcoded = creates test module that uses hardcoded test cases.
     	testclass = creates test class which is used with TestScripter.
     	luatestclass = creates test class which is used with LuaScripter.
     	minunit =  creates xUnit compatible test module
     	exit = Exit.
     Enter ModuleType (name/shortcut): m
     minunit module selected.
     Enter ModuleName which has to be a valid C variable name.
     Enter ModuleName (or exit): minunitexample
     Enter path [default is home directory ~] (or exit):
     Create test module of type m with name minunitexample to ~/
     Starting module creation to /home/user/minunitexample/
     Processing .
     Processing Makefile.am.build
     Processing createminunitmodule
     Processing ChangeLog
     Processing NEWS
     Processing autogen.sh
     Processing build.sh
     Processing AUTHORS
     Processing README
     Processing configure.ac
     Processing Makefile.am.dpkg
     Processing src
     Processing MINUnitXXX.c
     Processing MINUnitXXXCases.c
     Processing MINUnitXXX.h
     Processing data
     Processing MINUnitXXX.min.conf
     Processing debian
     Processing rules
     Processing postinst
     Processing control
     Processing changelog
     Processing install
     Processing copyright
     Processing compat
     Processing postrm
     Processing prerm
     Module created to /home/user/minunitexample/
An example of compiling the recently created module is shown in below.
maemo@maemo:/tmp/example_module$ sh build.sh
The build script defines your test library automatically to min.conf file (min.conf path is /home/<user name>/.min/).
If you now start MIN newly created module should be visible on the console UI.
Another option is create debian package of the test module. This can be achieved by issuing command dpkg-buildpackage -r fakeroot on the module directory. The created debian package installs the module to /usr/lib/min and its' configuration file to /etc/min.d.
Implement a test case as a separate function to a <own_module_name>.c file using the following type of method:
int test_X( TestCaseResult* tcr )
Add your new function also into int tm_get_test_cases( const char * cfg_file, DLList ** cases ) -function.
ENTRY(*cases,"My new test case", test_X);
See also examples from min/src/test_libraries/. For example testlibrary2.c shows an example of a test module that has all the test cases implemented inside a test module.
To add new test cases to test modules that have just been created, the user must modify the functions tm_get_test_cases() and tm_run_test_case().
MIN calls the tm_get_test_cases() function to get the test cases from the test module.
MIN calls the tm_run_test_case() function to execute a test.
Implement a test case as a separate function to a <own_module_name>Cases.c file using the following type of function:
     MIN_TESTDEFINE(test_dllist_create)
     {
     MIN_ASSERT_NOT_EQUALS( l, 0 );
     }
The file consists of two sections TEST_VAR_DECLARATIONS and TEST_CASES.
Variables that are common for all test cases are defined in the TEST_VAR_DECLARATIONS section.
The TEST_CASES section contains test fixtures (MIN_SETUP and MIN_TEARDOWN) and the test cases (MIN_TESTDEFINE). Code placed in the MIN_SETUP is executed for each test case before the test case execution; and MIN_TEARDOWN after each test case. The MIN_SETUP section should be used to initialize the common variables and possible startup routines. Similarly MIN_TEARDOWN can be used for clean up routines (e.g., freeing memory).
Implementation of test case itself is done by adding new MIN_TESTDEFINE section to TEST_CASES section. Name of the new test cases is defined as a parameter for the macro. Needed test case functionality must be placed in this section (apart from setup and teardown activities).
The result of each test case is determined by using of one or several MIN_ASSERT_ macros. If any of the MIN_ASSERT_ macros discovers that the test case result is other than expected, test case result will be marked as failed.
Often a source package contains test cases that are built as part of the package, and can be run to verify that the software is functioning properly, after it has been built. This chapter explains how MIN could be used for this purpose.
Makefiles for HardCoded, Normal and MINUnit test modules, created by the Test Module Template Wizard (createtestmodule), contain a make target for executing all the tests in the module with command make check.
     maemo@maemo:~/mymodule$ make check
     make  mymoduleTestModule.so
     make[1]: Entering directory `/home/maemo/mymodule'
     make[1]: `mymoduleTestModule.so' is up to date.
     make[1]: Leaving directory `/home/maemo/mymodule'
     make  check-TESTS
     make[1]: Entering directory `/home/maemo/mymodule'
     Checking for active min processes...
     Checking for active tmc processes...
     Checking for MQ left behind...
     Checking for SHM left behind...
     MIN Test Framework,  Nokia 2008, All rights reserved,
     licensed under the Gnu General Public License version 2,
     Contact: Pekka Nuotio, DG.MIN-Support@nokia.com

     Test case gathering...1
       2008-10-13 04:18:10
         ---------
       * Test Module /home/maemo/mymodule/mymoduleTestModule.so
         ---------
         Test Case: mymodule_1
           o Test Result: success
           o Result Desc: PASSED
           o Message    : Passed
         ---------
         Test Case: mymodule_2
           o Test Result: failure
           o Result Desc: AssertEquals failed
           o Message    : Failed
     FAIL: mymoduleTestModule.so
     ===================
     1 of 1 tests failed
     ===================
     make[1]: *** [check-TESTS] Error 1
     make[1]: Leaving directory `/home/maemo/mymodule'
     make: *** [check-am] Error 2
If there are many test suites to be added to the build, creating them individually with Test Module Template Wizard may be undesired, since each module is generated to own directory, and contains files that could be shared between the modules. For MINUnit a new way of creating test modules is introduced. MIN now installs from the folder min/shared a file (minunit.c), which can be used by all MINUnit modules, so that the file is compiled with a pre-processor flag stating the file containing the test cases. Example shows Makefile.am for two test modules used in this fashion.
     check_PROGRAMS = testmodulea.so testmoduleb.so
     TESTS = $(check_PROGRAMS)
     TESTS_ENVIRONMENT = min --console --execute

     testmodulea_so_CFLAGS = -DCASES_FILE='"a_testCases.c"'
     testmodulea_so_LDFLAGS = -shared
     testmodulea_so_SOURCES = ../shared/minunit.c
     testmodulea_so_LDADD =  -lminutils -lmintmapi -lminevent

     testmoduleb_so_CFLAGS = -DCASES_FILE='"b_testCases.c"'
     testmoduleb_so_LDFLAGS = -shared
     testmoduleb_so_SOURCES = ../shared/minunit.c b_test_utils.c
     testmoduleb_so_LDADD =  -lminutils -lmintmapi -lminevent
MIN package contains unit tests, that can be executed to verify operation of MIN components, by executing command make check in directory min/ after MIN has been built and installed. The traditional CHECK tests are in directory min/tests, and tests that are using MIN tool itself can be found from min/mintests.
This chapter contains the MIN Parser API description for guidance on how to use MIN Parser for test data parsing.
Figure below shows how MIN Parser is involved in MIN. Test Engine uses MIN Parser for parsing data from the MIN configuration file (min.conf). MIN Parser can be used when parsing test data for test modules. Test data can be included in a test module's test case file, a test module's initialization file or a buffer.

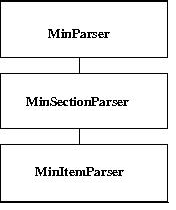
MIN Parser is divided into three main parts: MinParser, MinSectionParser and MinItemParser (see figure below).
MIN Parser supports hierarchical parsing for:
MIN Parser also supports INCLUDE command. See the following limitations of this feature:
The MinParser component functionality opens and reads test data. The purpose of MinParser is to parse a required section of the test data. The section may be a whole test data file or some part of the data file.
The main functions of MinParser are:
mp_create for creating a parser with path and file information
mp_create_mem
mp_destroy
mp_section
mp_next_section
MinParser* mp_create(const TPtrC* path, const TPtrC* file, TCommentType comments)ENOENT: invalid path argument.
EACCES: permission denied.
const TPtrC* pathconst TPtrC* fileTCommentType commentsENoComments: Comments are included with parsing.
ECStyleComments: The user wants to parse sections without c-style comments.
MinParser* mp_create_mem(const TPtrC* buffer, TCommentType comments)const TPtrC* bufferTCommentType commentsENoComments: Comments are included with parsing.
ECStyleComments: The user wants to parse sections without c-style comments.
void mp_destroy(MinParser** mp)MinParser** mpINITPTR pointer value is returned in mp pointer parameter if destroying operation completed successfully.
MinSectionParser* mp_section(MinParser *mp, const TPtrC* start_tag, const TPtrC* end_tag, int seeked)If end tag is empty the parsing goes end of configuration file.
This function will parse next section after the earlier section if the sought parameter is set to 1.
If configuration file includes several sections with both start and end tags so sought parameter seeks the required section.
EINVAL: invalid value was passed to the function.
MinParser *mpconst TPtrC* start_tagIf the start tag is empty, the parsing starts at the beginning of the file.
const TPtrC* end_tagIf the end tag is empty, the parsing goes to the end of the file.
int seekedMinSectionParser* mp_next_section( MinParser *mp, const TPtrC* start_tag, const TPtrC* end_tag, int seeked)If end tag is empty the parsing goes end of configuration file.
This method will parse next section after the earlier section if sought parameter is set to 1.
If configuration file includes several sections with both start and end tags so sought parameter seeks the required section.
:EINVAL: Invalid value was passed to the function.
MinParser *mpconst TPtrC* start_tagIf the start tag is empty, the parsing starts at the beginning of the file.
const TPtrC* end_tagIf the end tag is empty, the parsing goes to the end of the file.
int seekedMinSectionParser struct object.
The purpose of MinSectionParser is to parse the required lines of the section to forward operations.
The main methods of CMinSectionParser are:
msp_create
msp_destory
msp_get_item_line
msp_get_next_item_line
msp_get_next_tagged_item_line
msp_sub_section
msp_next_sub_section
msp_next_sub_section
msp_get_line
msp_get_next_line
msp_get_next_tagged_line
msp_get_position
msp_set_position
msp_set_data
msp_des
MinSectionParser* msp_create(unsigned int length);unsigned int lengthENOMEM: No sufficient memory to allocate new struct object.
MinSectionParser struct object.
void msp_destroy(MinSectionParser** msp)MinSectionParser** mspMinItemParser or INITPTR in case of failure.
ENOMEM: No sufficient memory to allocate new struct object.
MinItemParser* msp_get_item_line(MinSectionParser* msp, const TPtrC* tag, TTagToReturmValue tag_indicator)Returns address of MinItemParser or INITPTR in case of failure.
MinSectionParser* mspconst TPtrC* tagTTagToReturmValue tag_indicatorMinSectionParser* msp_get_next_item_line(MinSectionParser* msp)MinSectionParser* mspMinItemParser* msp_get_next_tagged_item_line(MinSectionParser* msp, const TPtrC* tag, TTagToReturnValue tag_indicator)Returns pointer to MinItemParser struct component.
MinSectionParser* mspconst TPtrC* tagTTagToReturnValue tag_indicatorMinSectionParser* msp_sub_section(TPtrC* start_tag, TPtrC* end_tag, int seeked)Returns pointer to MinSectionParser struct component.
const TPtrC* start_tagconst TPtrC* end_tagint seekedMinSectionParser* msp_next_sub_section(MinSectionParser* msp, const TPtrC* start_tag, const TPtrC* end_tag, int seeked)Returns pointer of MinSectionParser or INITPTR in case of failure.
MinSectionParser* mspconst TPtrC* start_tagconst TPtrC* end_tagint seekedMinSectionParser* msp_next_sub_section(MinSectionParser* msp, const TPtrC* start_tag, const TPtrC* end_tag, int seeked)MinSectionParser* mspconst TPtrC* start_tagconst TPtrC* end_tagint seekedint msp_get_line(MinSectionParser* msp, const TPtrC* tag, TPtrC** line, TTagToReturnValue tag_indicator)EINVAL errno value when invalid value was passed as a parameter.
MinSectionParser* mspconst TPtrC* tagTPtrC** lineTTagToReturnValue tag_indicatorint msp_get_next_line(MinSectionParser* msp, TPtrC** line)EINVAL when invalid value was passed as a parameter.
MinSectionParser* mspTPtrC** lineint msp_get_next_tagged_line(MinSectionParser* msp, const TPtrC* tag, TPtrC** line, TTagToReturnValue tag_indicator)EINVAL when invalid value was passed as a parameter.
MinSectionParser* mspconst TPtrC* tagTPtrC** lineTTagToReturnValue tag_indicatorint msp_get_position(MinSectionParser* msp)EINVAL when invalid value was passed as a parameter.
MinSectionParser* mspint msp_set_position(MinSectionParser* msp, unsigned int pos)EINVAL when invalid value was passed as a parameter.
MinSectionParser* mspunsigned int posvoid msp_set_data(MinSectionParser* msp, const TPtrC* data, TPtrC* start_pos, unsigned int length)MinSectionParser* mspconst TPtrC* dataTPtrC* start_posunsigned int lengthconst TPtrC* msp_des(const MinSectionParser* msp)const MinSectionParser* mspThe purpose of MinItemParser is to parse strings, integers and characters. The main methods of MinSectionParser are:
mip_create
mip_destroy
mip_parse_and_end_pos
mip_get_string
mip_get_next_string
mip_get_next_tagged_string
mip_get_int
mip_get_next_int
mip_get_next_tagged_int
mip_get_uint
mip_get_next_uint
mip_get_next_tagged_uint
mip_get_char
mip_get_next_char
mip_get_next_tagged_char
mip_get_remainder
mip_set_parsing_type
mip_get_parsing_type
MinItemParser* mip_create(TPtrC* section, int start_pos, int length)TPtrC* sectionint start_posint lengthvoid mip_destroy(MinItemParser** msp)Returns INITPTR if destroying operation complete successfully.
MinItemParser** mspint mip_parse_start_and_end_pos(MinItemParser* mip, TPtrC* start_tag, TPtrC** ref_start_pos, TPtrC** ref_end_pos, TPtrC** ref_extra end_pos)If start tag keyword is used then method searches string data after this given keyword. If start tag is not used then parsing starts at the beginning of section string.
EINVAL errno value when parsing operation failed.
MinItemParser* mipTPtrC* start_tagTPtrC** ref_start_posTPtrC** ref_end_posTPtrC** ref_extra end_pos 0 if parsing operation completed successfully
-1 if operation failed.
int mip_get_string(MinItemParser* mip, TPtrC* tag, TPrtC** string)EINVAL errno value when parsing operation failed.
MinItemParser* mipTPtrC* tagTPrtC** string 0 if parsing operation completed successfully
-1 if operation failed.
int mip_get_next_string(MinItemParser* mip, TPtrC** string)EINVAL errno value when parsing operation failed.
MinItemParser* mipTPtrC** string 0 if parsing operation completed successfully
-1 if operation failed.
int mip_get_next_tagged_string(MinItemParser* mip, TPtrC* tag, TPtrC** string)EINVAL errno value when parsing operation failed.
MinItemParser* mipTPtrC* tagTPtrC** string 0 if parsing operation completed successfully
-1 if operation failed.
int mip_get_int(MinItemParser* mip, TPtrC* tag, int* value)EINVAL errno value when parsing operation failed.
MinItemParser* mipTPtrC* tagint* value 0 if parsing operation completed successfully
-1 if operation failed.
int mip_get_next_int(MinItemParser* mip, init* value)EINVAL errno value when parsing operation failed.
MinItemParser* mipinit* value 0 if parsing operation completed successfully
-1 if operation failed.
int mip_get_next_tagged_int(MinItemParser* mip, TPtrC* tag, int* value)EINVAL errno value when parsing operation failed.
MinItemParser* mipTPtrC* tagint* value 0 if parsing operation completed successfully
-1 if operation failed.
int mip_get_uint(MinItemParser* mip, TPtrC* tag, unsigned int* value)EINVAL errno value when parsing operation failed.
MinItemParser* mipTPtrC* tagunsigned int* value 0 if parsing operation completed successfully
-1 if operation failed.
int mip_get_next_uint(MinItemParser* mip, unsigned int* value)EINVAL errno value when parsing operation failed.
MinItemParser* mipunsigned int* value 0 if parsing operation completed successfully
-1 if operation failed.
int mip_get_next_tagged_uint(MinItemParser* mip, TPtrC* tag, unsigned int* value)EINVAL errno value when parsing operation failed.
MinItemParser* mipTPtrC* tagunsigned int* value 0 if parsing operation completed successfully
-1 if searching operation failed.
int mip_get_char(MinItemParser* mip, TPtrC* tag, TPtrC** chr)EINVAL errno value when parsing operation failed.
MinItemParser* mipTPtrC* tagTPtrC** chr 0 if parsing operation completed successfully.
-1 if section string length is zero.
-2 if parsing operation failed by any reason.
int mip_get_next_char(MinItemParser* mip, TPtrC** chr)EINVAL errno value when parsing operation failed.
MinItemParser* mipTPtrC** chr 0 if parsing operation completed successfully
-1 if next character searching failed.
int mip_get_next_tagged_char(MinItemParser* mip, TPtrC* tag, TPtrC** chr)EINVAL errno value when parsing operation failed.
MinItemParser* mipTPtrC* tagTPtrC** chr 0 if parsing operation completed successfully
-1 if next character searching failed.
int mip_get_remainder(MinItemParser* mip, TPtrC** string)EINVAL errno value when parsing operation failed.
MinItemParser* mipTPtrC** string 0 if parsing operation completed successfully
-1 if remainder string parsing failed.
int mip_set_parsing_type(MinItemParser* mip, TParsingType type)EINVAL errno value when parsing operation failed.
MinItemParser* mipTParsingType type 0 if parsing operation completed successfully
-1 if MinItemParser struct component not available.
TParsingType mip_get_parsing_type(MinItemParser* mip)EINVAL errno value when MinItemParser struct component not available.
MinItemParser* mip-1 if operation failed.
Note 1: ENormalParsing type parsing is takes string after tag keyword and is separated result strings by white spaces. For example, if the section string is "Tag1 Word1 Word2 Tag2 Word3 Word4 Tag3 Word5 Word6" if is used tag "Tag2" then parsed result string is "Word3" by mip_get_string() method. If after this parsing will did new parsing by mip_get_next_string() then next parsed result string is "Word4".
Note 2: EQuoteStyleParsing type parsing takes string inside of two quotes and this parsed may including also white spaces. For example, if only the start tag has been found from the section string then parsing will be returned rest of string after start tag.
Note 3: If section string including comments strings with two backslashes then parsing will be returned string after the first backslashes.
The Test Scripter test case file defines the commands to be executed in a test case described with a simple scripting language. The test case file may contain several test cases, the descriptions of which start with the tag [Test] and end with the tag [Endtest]. The test case is executed sequentially line by line. The test case itself is described with keywords, arguments and argument value pairs between the start and end tags. An example of a test case is described below.
     [Test]
     title Create, print, run example and delete
     createx TestScriptClass testobj
     print Call Example method
     testobj Example pa ra me ters
     print Example method called, delete instance
     delete testobj
     [Endtest]
The test case title must be given after the title keyword on the first line of the test case definition. In the example above, the create keyword creates a new instance of TestScriptClass, which is named test. The print keyword is used to print information to the UI. The fourth line of the example test case executes the Example method of the test object with four parameters: pa, ra, me and ters. The delete keyword is used to delete the test object.
Test Scripter's test case file and test module initialization file may contain macro definitions used in test cases. Macros are defined inside a define section started with [Define] tag ended with [Enddefine] tag, for example:
     [Define]
     ENOERR 0
     [Enddefine]
Test Scripter is configured for use by adding Test Scripter as a test module to MIN. The test case file is added as a test case file for Test Scripter. An example of configuring Test Scripter as a test module can be seen in example in section Configuring MIN via the MIN Test Framework initialization file.
A new test class can be easily created with MIN Test Module Template Wizard that comes with the MIN release
$ createtestmodule
A new test class is now created with the given name to the given path. The next step is to create the building block methods to the test class.
To create the building block methods to the test class:
/<testclassname>/src/<testclassname>Cases.c file (there is one example method, ExampleTest, that can be copy-pasted).
<testclassname>Cases.c):
ENTRY(*list,"Example",ExampleTest);
LOCAL int ExampleTest( MinItemParser* item );
/<testclassname>/group directory by using build.sh script. It will automatically copy test class library to /home/<user name>/.min.
Now the test class is created. The next step is to implement test cases to test the test case file used by Test Scripter. An example test case file can be found in /<testclassname>/group/Example.CFG. The test case file is constructed using the script language defined in this document.
Copy the test case file to /home/<user name>/.min/
Now you should be able to execute your test class module by using console UI or EXT INTERFACE.
Script local variables (See var keyword.) can be retrieved from inside the test class as well as set to different value . The functions below are available for test class to set and get variable values.
     int SetLocalValue (const char *varname, const char *varval);
     /* --------------------------------------------------------------- */
     /** Assign integer value to script variable
      * @param varname name of variable
      * @param varval value to assign
      * @return 0 on success, -1 on error
      */
     int SetLocalValueInt (const char *varname, const long value);
     /* --------------------------------------------------------------- */
     /** Get value of script variable as an integer
      * @param varname name of variable
      * @param value [out] variable value
      * @return 0 on success, -1 on error
      */
     int GetLocalValueInt (const char *varname, long *value);
     /* --------------------------------------------------------------- */
     /** Get value of script variable as a string
      * @param varname name of variable
      * @param value [out] variable value
      * @return 0 on success, -1 on error
      */
     int GetLocalValue (const char *varname, char **value);
Note that test class can only get and set local script variables, it's not possible to declare variables in the tests class.
Scirpter holds internal variables that are available to script or test class similar to local variables. The internal variables are counters shown in and can be used, for example, to bail out from a long test loop in case some error level is reached, or to call some special clean up function in case of crashed test method calls.
FAIL_COUNTCRASH_COUNTTOUT_COUNTABORT_COUNTERROR_COUNTTOTAL_COUNTThe title keyword is used to give a verbal description for a test case. The description is placed after the keyword. The title keyword is mandatory for every test case and must be placed as the first keyword in the test case description (Test Scripter test case file). For example:
title Create, print, run example and delete
The timeout keyword is used to give a timeout value for a test case. The timeout value is given as an argument for the timeout keyword, as shown below.
The timeout keyword can be used, for example, in the following way (timeout 10 seconds):
timeout 10000
The blocktimeout keyword is used to give a timeout value for blocking scipter commands (for example allocate, expect, wait). The timeout value is given in seconds. Value 0 means no timeout, unless the blocking timeout is specified in test script, it defaults to 10 minutes.
The blocktimeout keyword can be used, for example, in the following way (timeout 10 seconds):
     # accept 5 minute timeout for event E
     blocktimeout 300
     wait E
     # no timeout
     blocktimeout 0
The print keyword can be used to print, for example, progress information to the UI. The printed description is placed after the print keyword; see the example in section Test Scripter test case file
The var keyword declares a variable for the scripter. A variable can be initialized during its declaration. The value of variable can be set in script or test class. When calling methods from a test object, the declared variable can be passed as an argument to this method. If variable name appears in text used with print keyword, its value gets printed.
The var keyword has one mandatory and one optional argument, described below.
Note: var keyword may be used to declare variables used in remote test case execution. See Remote test case control, expect keyword.
The var keyword can be used for example in the following way:
     var variable2
     var variable1 text
     var variable2 1
     sometestobj somemethod variable1 variable2
     print variable2
The createx keyword is used to create a new instance of a test class. createx has two mandatory arguments, which are described below.
The createx keyword can be used, for example, in the following way:
createx TestScriptClass test
The delete keyword is used to delete an instance of a test class. delete has one mandatory argument, which is described in Table below.
The delete keyword can be used, for example, in the following way:
delete test
The allownextresult keyword is used to add valid result values for a method and for asynchronous commands. The default value for the expected result is 0, and if a value is set with allownextresult, 0 is removed from the expected values. A method may either return or leave with the specified result. Every method call removes all allowed results. That is, after every method call, the default value 0 is again the only expected result value. Either multiple allownextresult keywords can be placed before a method call or allownextresult keyword can have multiple parameters.
The allownextresult keyword can be used, for example, in the following way:
allownextresult -1
The allownextresult keyword can be used, for example, in the following way:
allownextresult -1 -2 -3 -4
The allowerrorcodes keyword is used to add valid result values for a method and for asynchronous commands. The default value for the expected result is 0, and if a value is set with allowerrorcodes, 0 is removed from the expected values. A method may either return or leave with the specified result. Every method call removes all allowed results. That is, after every method call, the default value 0 is again the only expected result value. Either multiple allowerrorcodes keywords can be placed before a method call or allowerrorcodes keyword can have multiple parameters.
The allowerrorcodes keyword can be used, for example, in the following way:
allowerrorcodes -1
The allowerrorcodes keyword can be used, for example, in the following way:
allowerrorcodes -1 -2 -3 -4
The sleep keyword is used to pause the execution of a test case for a specified timeout. Sleep has one mandatory argument, which is described below.
The sleep keyword only stops the test case line-runner active object for the specified period. All the other user active objects will continue to be serviced. That is, no further lines of the test case file will be executed during that delay, but the process is not halted; any user active objects may still be completed.
The sleep keyword can be used, for example, in the following way:
sleep 10000 // pause for 10 seconds
Note: sleep keyword works in the same way as deprecated pausecombiner keyword.
pausecombiner works in the same way as sleep keyword. See sleep keyword.
The run keyword is used to start a specified test case. It has several mandatory and optional arguments, described below.
ENOERR
Note: Avoid using the same testid for many test case runs
The run keyword can be used for example in the following way:
     run netmodule net.cfg 5 testid=test1 expect=3 ini=ini.txt
     run netmodule net.cfg -1 testid=test2 title="My test case example"
The cancel keyword is used to cancel a started test case. The test case is cancelled by immediately killing the thread that executes the test case. The cancel keyword has one mandatory argument as described below.
The cancel keyword can be used, for example, in the following way:
cancel test1
The pause keyword is used to pause a test case. The test case is paused by stopping the process that executes the test case. The pause keyword has one mandatory and one optional argument, described below.
The pause keyword can be used, for example, in the following way:
pause test1 time=10
The resume keyword is used to resume a paused test case. resume has one mandatory argument, described below.
The resume keyword can be used for, example, in the following way:
resume test1
The complete keyword is used to have a started test case wait to complete. It blocks until the test case has finished. complete has one mandatory argument, described below.
The complete keyword can be used, for example, in the following way:
complete test1
Note: If this keyword is used when more than one test case has the same testid (even if it's completed already) it will wait for the last test case to complete. Avoid using the same testid for many test case runs. See run keyword.
The loop keyword is used to repeat a section of the test case file for the specified number of iterations. The section to be repeated is enclosed with the loop and endloop keywords.
msecThe loop keyword can be used, for example, in the following way:
     loop 5
     // execute this 5 times
     print pa ra me ter
     endloop
The breakloop keyword is used to prematurely exit the current loop.
The breakloop keyword can be used, for example, in the following way:
     loop 5
     var exitcond
     someclass somemethod someparam
     if exitcond
         breakloop
     endif
     endloop
The endloop keyword is used to specify the end of a looped section.
The if, else and endif keywords can be used for conditional execution in the script. The condition for if must be variable or value. Value 0 and string "false" (case insensitive) is interpreted as false, other values as true. If block must always be closed with endif keyword. Nesting of if-blocks is supported.
     var v
     if v
       print is true
     else
       print is false
     endif
The test object name can be considered as a temporary keyword, which is valid between its creation with the createx keyword and its deletion with the delete keyword. The object name is used to call methods from a test object. The method name is given as the first argument for the object name, and the method may have arguments, which are forwarded to the test class method.
For example:
TestObjectName MethodName <method arguments 1 2 3>.
The keywords described in the following sections are used to control MIN Event System. For information about MIN Event System. See Using MIN Event System for test cases synchronization.
The request keyword is used to request an event. If someone wants to use an event, it must first be requested, and after that it can be waited. After the event is not used anymore, it must be released.
The request keyword has one mandatory argument, and one optional parameter. Both are described below.
The request keyword can be used, for example, in the following ways:
     request Event1
     request Event2 state
The wait keyword is used to wait for an event. A request must be called before wait, and wait blocks until the requested event is set. wait may proceed immediately if the requested event is a state event and already pending (for example, a phone call is already active). wait has one mandatory argument, which is described below.
The wait keyword can be used, for example, in the following way:
wait Event1
The release keyword is used to release an event. Every requested event must be released explicitly when it is not used anymore. release has one mandatory argument, which is described below.
The release keyword can be used, for example, in the following way:
release Event1
The set keyword is used to set an event. Every set state event must be explicitly unset.
set has one mandatory argument and also one optional argument, as described below.
The set keyword can be used, for example, in the following ways:
     set Event1
     set Event2 state
The unset keyword is used to unset a state event. Every set state event must be unset. Indication events cannot be unset. unset blocks until everyone who has requested the specified event has released the event.
unset has one mandatory argument, which is described below.
The unset keyword can be used, for example, in the following way:
unset Event1
The allocate keyword is used to allocate a slave, for example for running a test case on a remote phone. It uses Remote Control Protocol (RPC). The slave must always be allocated first before it can be used.
The allocate keyword has two mandatory arguments, described below.
MIN only supports slave phone. phone indicates that slave phone is also running MIN. Other types must be handled by the slave implementation, i.e. when implementing separate support for external network simulator.
The allocate keyword can be used for example in the following way:
allocate phone MySlave
Every allocated slave must be freed with free when it becomes unused.
The free keyword has one mandatory argument, described below.
free can be used for example in the following way:
free MySlave
The sendreceive keyword is used in slave script to send a variable value from slave to master. Sending a variable value from master to slave is described in Section remote keyword.
The sendreceive keyword has two mandatory arguments, described below.
The sendreceive keyword can be used for example in the following way:
sendreceive variable1=/tmp/file.txt
The expect keyword is used in slave script to expect a variable value from master. Variable must be declared by using var keyword. Expecting a variable value from slave to master is described in Section remote keyword.
The expect keyword has one mandatory argument, described below.
The expect keyword can be used for example in the following way:
     var variable1
     expect variable1
The remote keyword is used to start the execution of a test case in a slave, to request and release events from the slave and sending a variable value to a slave or expecting a variable value from a slave. Other test case controlling for remote test cases is done with the same keywords as for the local test cases.
The remote keyword has two mandatory arguments, described below.
run, request, wait, set, unset, release, expect, sendreceive).
The remote keyword can be used for example in the following ways:
     remote MySlave run netmodule net.cfg 5
     remote MySlave request Event1
     remote MySlave wait Event1
     remote MySlave set Event1
     remote MySlave unset Event1
     remote MySlave release Event1
     remote MySlave expect variable1
     remote MySlave sendreceive variable1=/tmp/file.txt
The remote keyword with sendreceive command is used in the master script for sending a variable value to one of the slaves identified by slave name. This remote command supports the same parameters as sendreceive keyword. See sendreceive keyword .
The remote keyword with expect command is used in master script for expecting a variable value from one of the slaves identified by slave name. This remote command supports the same parameters as the expect keyword. See expect keyword .
The other supported remote commands are run, request, release, set, unset and wait. They support the same parameters as the same keywords described in run keyword, request keyword and release keyword.
This chapter describes Lua Test Scripter feature of MIN. Lua Test Scripter feature is used for running scripted test cases where the script itself is written in Lua scripting language (www.lua.org).
Lua is a modern and flexible scripting language designed to be embedded in C or C++. It gives out of the box support for arrays, variables, control structures (if/else, while, for, repeat). It has functions and even threads.
For further details, please visit www.lua.org.
The Lua Scripter uses scripts written in Lua as the test case file. Each test must be defined as a separate function which does not take any parameters and which is prefixed with "case_" statement. Test case file may contain several test functions, and some defined global variables as well. User can define its own functions inside of a test case file - every function not prefixed with "case_" will not be treated as test case.
The test case result is returned from test case function to the MIN by using return keyword.
Interaction with MIN is achieved by using MIN2Lua API which is covered in this chapter.
An example of a test case file is described below:
     function case_foo() -- Test case title
     	min.print("Hello World");
     	return TP_PASSED;
     end
Test case file may contain definitions. The definitions are global variables and can be defined as follows:
     -- Begin of define section
     MODULE = TestCaseModuleThatCanBeUsedWithLua
     -- End of define section

     function case_foo() -- Test case title
     	min.print(string.format("Using: %s test module",MODULE));
     end
Lua Scripter is configured for use by adding Lua Scripter as a test module to MIN. The test case file is added as a test case file for Lua Scripter. An example:
     [New_Module]
     ModuleName=luascripter
     TestCaseFile=script.lua
     [End_Module]
Example above defines a new module for MIN (should be put in min.conf file) that uses Lua Scripter module with script.lua test case file.
In order to use user created test code with Lua Scripter it is necessary to use MIN test module which is compliant with Lua: the Lua test class module.
A new Lua test class can be easily created with MIN Test Module Template Wizard that comes with the MIN release
$createtestmodule
A new Lua test class is now created with the given name to the given path. The next step is to create the building block methods to the test class.
To create the building block methods to the Lua test class:
/<testclassname>/src/<testclassname>Cases.c file (there is one example method, that can be copy-pasted).
ts_get_test_cases (<testclassname>Cases.c):
ENTRY(*list,"Example",ExampleTest);
LOCAL int ExampleTest( lua_State *l );
/<testclassname> directory by using build.sh script. It will automatically copy test class library to /home/<user name>/.min.
Now the Lua test class is created. The next step is to implement test cases to test the test case file used by Lua Scripter. An example test case file can be found in /<testclassname>/Example.lua. The test case file is constructed using the script language defined in this chapter.
Copy the test case file to /home/<user name>/.min/
Now you should be able to execute your test class module by using console UI or EXT INTERFACE.
This chapter describes the MIN2Lua API as well as it gives a general look on the Lua syntax.
Test cases defined in Lua scripting language return their results by value (as they are functions). Two macros are provided: TP_PASSED and TP_FAILED.
Example:
     function case_function() -- This is a title
     	Return TP_PASSED;
     end

     function case_function() -- This is a title
     	Return TP_FAILED;
     end
Test case result description is returned as a second value from function. It is recommended but not needed to have proper test case.
Example:
     function case_function() -- This is a title
     	Return TP_FAILED,"Test Case result description";
     end
The title is used to give verbal id to the test case. If test case title is defined it will be seen on the Console UI, if not then function name will be seen instead. It is recommended to add title to each test case.
Test case title is defined in the same line on which function name is written, after "--"-marks. Please note that this -- is a comment in Lua.
     function case_function() -- This is a title

     end
The example above shows a test case with title defined, where following example shows test case without title:
     function case_function()

     end
Both of them will be shown on the Console UI, which differs from standard MIN Scripter (In standard MIN Scripter test case title is mandatory).
Each test case is a method exported from Test Module. First of all it is a must to load Lua Test Class as a Test Module, then you can call each test function as follows:
     function case_function() -- load test
     	foo = min.load("Bar");
     	foo.Example();
     	min.unload(foo);
     	return TP_PASSED;
     end
Note that the following call:
foo.Example();
is referring to the test function name given in ENTRY macro. It is not the real test function name.
Cooperation between MIN and script written in Lua is done by API defined in MIN and exported to the script. All functions are placed in min namespace.
The print functionality can be used to print messages on the Console UI.
     function case_function() -- print test
     	min.print("Hello World");
     	return TP_PASSED;
     end
It is also possible to use message formatting, to achieve this one must use built-in Lua string functionality called format
     function case_function() -- print test with formatting
     	min.print(string.format("Message: %s, id %d",Hello,112));
     	return TP_PASSED;
     end
The load functionality is used to load Lua Test Class provided by the end user. As a parameter it takes module name. As a result it returns a handle to the loaded Lua Test Class that can be used to call user defined test cases from the loaded Test Module.
If loading fails then returned value is nil
     function case_function() -- load test
     	foo = min.load("Bar");
     	if foo == nil then
     		return TP_FAILED;
     	end
     	foo.Example();
     	min.unload(foo);
     	return TP_PASSED;
     end
Example above will load module Bar.so (extension is added automatically) from paths specified in min.conf file. Module handler is checked then if loading has been correct.
The unload functionality is used to unload loaded Lua Test Class. As a parameter it takes the handle to the loaded Test Module. See load method.
The sleep functionality is used to pause test case execution for a specified amount of time. As a parameter it takes the time in milliseconds.
Example shows 1 second sleep:
     function case_function() -- sleep example
     	min.sleep(1000);
     end
The request functionality is used to request an event. As a parameter it takes the name of the event to be requested and as an optional second parameter the event type which can be StateEvent or IndicationEvent. By default it is StateEvent.
Examples:
     function case_function() -- request example state event
     	min.request("Event1");
     end

     function case_function() -- request example state event 2
     	min.request("Event1",StateEvent);
     end

     function case_function() -- request example indication event
     	min.request("Event1",IndicationEvent);
     end
Note that it is needed to release event after it has been requested.
Method request may be also used to request an event from slave. See Remote test case execution.
     function case_function() -- remote example
     	slavehnd = min.slave_allocate(SlaveTypePhone,"Slave1");
     	slavehnd:request( "Event1");
     	min.slave_free(slavehnd);
     end
The release functionality is used to release requested event. As a parameter it takes the name of the already requested event.
     function case_function() -- release example
     	min.request("Event1");
     	min.release("Event1");
     end
Method release may be also used to release an event using slave handler.
     function case_function() -- remote example
     	slavehnd = min.slave_allocate(SlaveTypePhone,"Slave1");
     	slavehnd:release( "Event1");
     	min.slave_free(slavehnd);
     end
The set functionality is used to set an event. As a parameter it takes the name of the event to be set and as an optional second parameter the event type which can be StateEvent or IndicationEvent. By default the type is IndicationEvent.
Examples:
     function case_function() -- set example indication event
     	min.set("Event1");
     end

     function case_function() -- set example state event 2
     	min.set("Event1",StateEvent);
     end

     function case_function() -- set example indication event
     	min.set("Event1",IndicationEvent);
     end
The unset functionality is used to unset a state event that has been set before. As a parameter it takes the event name.
Example:
     function case_function() -- unset example
     	min.set("Event1",StateEvent);
     	min.unset("Event1");
     end
The wait functionality is used for waiting for requested event. Event might be requested before wait is used, but this is not a must. If event has not been requested it will be requested and released in wait function. As a parameters wait takes event name and optional event type which can be StateEvent or IndicationEvent. By default it is IndicationEvent.
Example:
     function case_function() -- wait example state event
     	min.wait("Event1");
     end

     function case_function() -- wait example 2 state event
     	min.request("Event1");
     	min.wait("Event1");
     	min.release("Event1");
     end

     function case_function() -- wait example state event
     	min.wait("Event1",IndicationEvent);
     end

     function case_function() -- wait example 2 state event
     	min.request("Event1",IndicationEvent);
     	min.wait("Event1",IndicationEvent);
     	min.release("Event1",IndicationEvent);
     end
Note that it is a must to wait for an event of the type the event has been requested.
The slave_allocate functionality allocates slave device which is needed for remote test case execution. As parameters it takes slave type and slave name. It returns a handle to the slave which is then used for calling methods on slave.
Available slave types are: SlaveTypePhone and SlaveTypeTablet
Example:
     function case_function() - slave_allocate example
     	slavehnd = min.slave_allocate(SlaveTypePhone,"Slave1");
     end
Note that the allocated slave must be freed.
The slave_free functionality is used to free allocated slave device. As a parameter it takes handler to the slave.
Example:
     function case_function() -- run example
     	slavehnd = min.slave_allocate(SlaveTypePhone,"Slave1");
     	min.slave_free(slavehnd);
     end
Method expect is used to wait for variable that will be passed from slave. As a parameter it takes name of the variable under which it has been send.
     function case_function() - remote expect example
     	slavehnd = min.slave_allocate(SlaveTypePhone,"Slave1");
     	a = slavehnd:expect("foo");
     	min.slave_free(slavehnd);
     end
Method send is used to send variable through external interface. As a parameter it takes the name under which it will be sent and the variable (number or string).
     function case_function() - remote expect example
     	slavehnd = min.slave_allocate(SlaveTypePhone,"Slave1");
     	a = 5;
     	slavehnd:send("foo",a);
     	min.slave_free(slavehnd);
     end
It is possible to execute functionalities on the slave device with following methods:
In order to do this one must use slave handler:
     function case_function() -- remote example
     	slavehnd = min.slave_allocate(SlaveTypePhone,"Slave1");
     	slavehnd:request("Event1");
     	min.slave_free(slavehnd);
     end

     function case_function() -- remote example 2
     	slavehnd = min.slave_allocate(SlaveTypePhone,"Slave1");
     	slavehnd.request(slavehnd,"Event1");
     	min.slave_free(slavehnd);
     end
Note that the first parameter is always slave handler. You must specify it when using '.' Or use ':' because then it is added automatically.
When using MIN, it is also possible to use python scripting language to create test case logic. MIN can treat specific Python functions as test cases, python extension module is provided that makes it possible to use MIN-specific features (like events or ability to combine test cases from other test modules).
The script language provided by "scripter" test module has several limitations. If it is needed to implement more sophisticated logic, one can use functions written in python as test cases. In that case, architecture of system is as presented on Figure below.
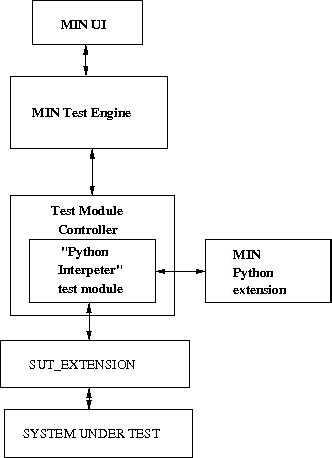
"Python Interpreter" test module and "MIN" Python extension are provided with MIN release. Python Interpreter test module is seen by system like any other test module. MIN Python extension is extension module that is imported by python script that serves as test case file (this will be explained in more detail later). SUT_EXTENSION is another extension module that python script needs to import. This one, however, is implemented by tester (based on template, also provided with MIN release). This extension serves as an interface to actual system under test.
To use python scripted test cases, user needs to configure python interpreter module like any other module, by appropriate entries in MIN configuration files, like in the following example (name of test case file is an example of course):
     [New_Module]
     ModuleName = pythonscripter
     TestCaseFile = pythonscript.py
     [End_Module]
Python scripter module reads script given as test case file, and uses functions with names starting with "case_" as test cases. More information on syntax of test case file will be given later. Then, python module is used as any other test module of MIN.
It should be noted, that during the execution, min modifies PYTHONPATH by appending definition of directories used to store files necessary for min python module. Appended directories are defined in min configuration file, in "ModSearchPath" entries. Variable is restored to original value after closing MIN.
Generally, just the Python script might be not enough to conduct testing. The simplest way to access the tested functionality might be from the C code, not Python code. One way to facilitate that is to use Python extension written in C. You are provided with template for that extension. This template contains a skeleton of all the functions that "Python extension" library has to contain, and stubs for example test functions. Then you can import a compiled library to you Python script, in which you can implement the logic of the test.
Apart from the simplest functionality - to load and execute a test case, MIN provides some additional features in the "test module API". Equivalent of this "API" for Python test cases is "MIN Python extension library". When this library is imported to a Python script, it gives you access to MIN functionalities such as printing to the MIN console UI, executing test cases from other modules and synchronizing test execution by events. Detailed reference of those functions will be provided later.
As was mentioned before, "Python scripter" module will read the specified Python script ("*.py"), and consider each function with name starting with "case_". If function has "docstring", contents of the docstring will be used as a title of test case by MIN, otherwise the function name will be used. If test case function returns "0", test case will be considered as passed by MIN any other value will be considered "failure" (if function returns "NULL", it is considered "crashed"). If you do not define return value for a test case function, the result will be undefined (most likely - failed).
Example below shows sample python scripter test case definition:
     import min_ext
     import sut_module1

     def case_ms1():
             """ping"""
             min_ext.Allocate_slave("phone_b")
             min_ext.Request_remote_event("phone_b","ping",)
             min_ext.Run_remote_case("phone_b","scripter","slave.scr",1)
             retval = min_ext.Wait_event("ping")
             if (retval == 0):
                      retval = sut_module1.Do_stuff()
             min_ext.Release_remote_event("phone_b","ping")
             min_ext.Free_slave("phone_b")
             return retval
MIN python extension library provides users with set of functions that enable them to use the same features as in other types of modules. Functions are described below (note that arguments are specified in order in which they should appear in function calls):
Print_to_cuiExample:
min_ext.Print_to_cui("Printout text")
Set_indication_event(mandatory) StringExample:
min_ext.Set_indication_event("MyEventInd")
Set_state_event(mandatory) StringExample:
min_ext.Set_state_event("MyEventState")
Unset_event(mandatory) StringExample:
min_ext.Unset_event("MyStateEvent")
Request_event(mandatory) String(optional) "state"Example:
     min_ext.Request_event("MyEventInd")

     min_ext.Request_event("MyEventState","state")
Release_event(mandatory) StringExample:
min_ext.Release_event("MyEvent")
Wait_event(mandatory) StringExample:
min_ext.Wait_event("MyEvent")
Complete_case(mandatory) String(optional)String(mandatory) StringExample:
     min_ext.Complete_case("min_hardcoded_module","testcase_title")

     min_ext.Complete_case("min_other_module","testcase_file","testcase_title")
Start_case(mandatory) String(optional)String(mandatory) StringExample:
     min_ext.Start_case("min_hardcoded_module","testcase_title")

     min_ext.Start_case("min_other_module","testcase_file","testcase_title")
Create_logger(mandatory) String(mandatory) String(mandatory) StringExample:
My_logger = min_ext.Create_logger("/tmp","logfile.log","txt")
Log(mandatory) intCreate_log)
(optional) char(mandatory) StringExample:
min_ext.Log(My_logger,"b","log this text")
Destroy_loggerCreate_logger.
(mandatory) intCreate_logger
Example:
min_ext.Destroy_logger(My_logger)
Allocate_slave(mandatory) StringExample:
min_ext.Allocate_slave("other_device")
Free_slave(mandatory) StringExample:
min_ext.Free_slave("the_other_device")
Request_remote_event(mandatory) String(mandatory) String(optional) "State"Comment: After the event is requested from remote device, master test case can wait on it in the same way it would wait on local event.
Example:
     min_ext.Request_remote_event("other_device","some_indication_event")

     min_ext.Request_remote_event("the_other_device","some_state_event","state")
Release_remote_event(mandatory) String(mandatory) StringComment: Function fails in case of problems in master/slave communication or faulty argument specification
Example:
min_ext.Release_remote_event("other_device","event")
Run_remote_case(mandatory) String(mandatory) String(optional) String(mandatory) intComment: Function is considered successful if remote test case was started. After that, only available method of communication with slave test case is by events. Result of remote test case will not be provided. However, python test case will not finish, until slave test case finishes (or external controller timeout expires).
Example:
     min_ext.Run_remote_case("other_device","hardcoded_min_module",1)

     min_ext.Run_remote_case("another_device","other_min_module","testcase_file",3)
MIN release package provides also Python template/wrapper for PyUnit tests. If you have already developed tests following the PyUnit format, you can also execute those under control of MIN. To do this:
minwrap.py template (placed under /min_py_module/min_ext/), replacing all occurrences of PyUnit_module_xxx with the name of the module containing PyUnit test cases. For convenience, save the file with another name, in directory specified in "PYTHONPATH" environment variable.
min.conf, giving file that you saved in previous point as a test case file.
This chapter contains the MIN Logger API description for guidance on how to use MIN Logger for logging purposes.
The purpose of MIN Logger is to get information from the modules in order to write different log files or to send information via Linux Syslog system to standard log output file. Logging to Null Output is also available from MIN Logger.
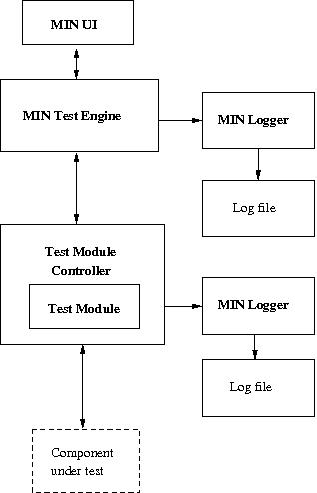
Figure below shows the basic architecture of MIN Logger and how it is involved in MIN. MIN Engine uses MIN Logger for Test Module Controller and Test Module logs. MIN Logger can be used when logging from test modules.
MIN Logger is divided into the following logger structures:
MinLoggerMinTxtLogger, MinHtmlLogger, and MinDataLoggerMinLoggerFileOutput, MinLoggerNullOutput and MinLoggerSyslogOutputhe methods of MIN Logger are listed and explained below: The main methods of MinLogger are:
mnl_create for creating MIN Logger "object"
mnl_destroy for destroying MIN Logger instance
mnl_log for logging message
mnl_write_delimiter for writing delimiter to log
mnl_write_own_delimiter for writing user defined delimiter to log
mnl_output_type for get information about used output plug-in
mnl_logger_type for get information which logs are created
MinLogger *mnl_create (const TSChar * path, const TSChar * file, unsigned int loggertype, unsigned int output, TSBool overwrite, TSBool withtimestamp, TSBool withlinebreak, TSBool witheventranking, TSBool pididtologfile, TSBool createlogdir, unsigned int staticbuffersize, TSBool unicode)const TSChar* pathconst TSChar* fileunsigned int loggertypeunsigned int outputTSBool overwriteTSBool withtimestampTSBool withlinebreakTSBool witheventrankingTSBool pididtologfileTSBool createlogdirunsigned int staticbuffersizeTSBool unicodevoid mnl_destroy (MinLogger** mnl)MinLogger** mnlint mnl_log (MinLogger * mnl, TSStyle style, const TSChar * format, ...);MinLogger * mnlTSStyle styleconst TSChar * format...mnl_write_delimiter (MinLogger * mnl)MinLogger * mnlvoid mnl_write_own_delimiter (MinLogger * mnl, const TSChar c, unsigned int t);MinLogger * mnlconst TSChar cunsigned int tunsigned int mnl_output_type (MinLogger * mnl)MinLogger * mnlunsigned int mnl_logger_type (MinLogger * mnl)MinLogger * mnlThere are five logging output variations: file output, null output, Syslog output, stdout output and stderr output. There are also three logging format types: normal text, html and data formats. When logging system is taken into use logger output and type are passed to mnl_create() method. Other parameters consists of target logging directory, filename, additional information options and used buffer size definitions. If logger creation is completed successfully then method returns pointer to created logger data structure. If creation failed then returned pointer is INITPTR value.
     MinLogger* min_logger = mnl_create( "/temp/logs/"
                                         , "min_testing.log"
                           	             , ESHtml
                                         , ESFile
                                         , ESTrue
                                         , ESTrue
                                         , ESTrue
                                         , ESFalse
                                         , ESFalse
                           		    , ESFalse
                           		    , 1000
                           		    , ESFalse );
Writing to log output is executed by mnl_log() method and it is possible to use text styles (e.g. bold, underline or "remark" additions) and "sprintf" style string formatting with mnl_log() method. This method returns error code if log writing failed by some reason.
     int retval = mnl_log( min_logger
      	             , ESBold
                          , "Process ID = %s. Current number = %d"
                          , pid, data );
It is also possible to add pre-defined or own specific delimiter character into logging file or output.
     mnl_write_delimiter( min_logger );

     mnl_write_own_delimiter( min_logger, ':', 1 );
MIN Logger API includes also getting methods to check used logger output plug-in and types.
     unsigned int output_types = mnl_output_type( min_logger );

     unsigned int logger_types = mnl_logger_type( min_logger );
Created logger data structure will be deleted by mnl_destroy() method after logging output not needed any more. If deletion is completed successfully then the used logger pointer is set to INITPTR value.
mnl_destroy( &min_logger );
For convenience MIN provides several macros that can be used for logging purposes. Those macros are MIN_XXX(char *format, ... ) where XXX is one of: TRACE, DEBUG, NOTICE, INFO, WARN, ERROR and FATAL. Those names indicates importance level for logged message (FATAL is the highest, TRACE is the lowest (the most verbose)).
Before one start using those macros the min_log_open(char *component, int level) function must be called. The supplied component name is then used in log messages to indicate the source of logged information, the level parameter is present only for binary compatibility and can be whatever value, usually 0.
When one is done with logger usage min_log_close() function should be called.
Typical usage looks like:
     min_log_open("Component Name",0);
     MIN_INFO("Log message number %d",1);
     MIN_DEBUG("Debug");
     min_log_close();
This chapter describes the use of MIN Event System for test cases synchronization.
The interface for event system is defined in file min_test_event_if.h and has three interface functions min_event_create(), min_event_destroy () and Event(). See MIN Event System usage.
The state events are used to indicate that some specific state is active or inactive. State events are cached, that is, their state is stored in Test Engine. This means that when a test case requests a state event, the state of the event is checked, and if it is active, the event is set immediately and it remains set as long as it is unset by the one who has set it. If the state is inactive, the event is set for the requesting client immediately after the event is set.

In figure above, first client 1 sets a specific state event. Then client 2 requests the event and goes waiting for it. The waiting returns immediately because the event is already set. After some processing, client 2 checks that the event is still active and after waiting returns immediately and proceeds with processing of its tasks. In the meanwhile, client 1 unsets the event, but the unset blocks because client 2 has requested the event. After client 2 releases the event, the unset returns to client 1. Client 2 starts processing again and requests the event again and goes waiting for it. Because the event is unset, the waiting blocks until client 1 sets the event and then the waiting returns to client 2. Then client 2 does its tasks and finally releases the event and client 1 unsets the event.
The indication events are used to send an event that a specific occasion has happened. Indications are not cached, so in order to receive an indication, it must have been requested before the indication event is set.

Figure above depicts the indication event handling. Client 1 sets a specific indication event always after some specific occasion. After client 2 starts, it requests the indication event and goes waiting for it. After client 1 sets the event, the waiting returns to client 2 and it proceeds the processing. After client 2 has done its tasks, it releases the event. Then client 1 sets the event again, but because client 2 has no pending event request, it does not get the event. Next, client 2 requests the event again. Client 1 then sets the event and when client 2 goes waiting for the event, it returns immediately because the event is set. After that, client 2 goes waiting for the event again and the waiting returns to client 2 when client 1 sets the event again. Finally, client 2 releases the event.
MIN Event System can be used for various purposes and in different ways. As an example, a state event can be used to indicate when a phone call is active: a state event is set right after the call is connected and unset just before the call is deactivated. Some other test case may request the state event and wait until it is set, then send an SMS and release the state event after that. It is guaranteed that the state remains until the requester releases the event, which means that the called unset blocks until the release is called. An indication event can be used for example to indicate that an HTTP packet is received: An indication event is set every time when an HTTP packet has been received. Some other test case may then e.g. wait for the indication event and then start heavy loading of the system to interfere with the Web page receiving. The following is a sample code for setting a state event:
     minEventIf *s_event = min_event_create ("TestModuleState1", EState);
     event->SetType (s_event, ESetEvent);
     Event (s_event);
The following is a sample code for unsetting a state event:
     event->SetType (s_event, EUnsetEvent);
     Event (s_event);
The following is a sample code for setting an indication event:
     minEventIf *i_event = min_event_create ("TestModuleIndication1",
                                             EIndication);
     event->SetType (i_event, ESetEvent);
     Event (i_event);
The following is a sample code for requesting, waiting and releasing a state event:
     minEventIf *s_event = min_event_create ("TestModuleState1",
                                             EState);
     s_event->SetType (s_event, EReqEvent);
     Event (s_event);
     s_event->SetType (s_event, EWaitEvent);
     Event (s_event);
     /* Do something */
     s_event->SetType(s_event, ERelEvent);
     Event (s_event);
The following is a sample code for requesting, waiting and releasing an indication event:
     minEventIf *i_event = min_event_create ("TestModuleIndication1",
                                              EIndication);
     i_event->SetType (i_event, EReqEvent);
     Event (i_event);
     i_event->SetType (i_event, EWaitEvent);
     Event (i_event);
     /* Do something */
     i_event->SetType (i_event, ERelEvent);
     Event (i_event);
This chapter describes how MIN can be used to run master/slave test cases over TCP/IP without the need for some external controller.
As of release 2009w19 MIN is shipped with MIN daemon (mind). The process listens to pre-defined port (51551) and when someone (master), connects that port, MIN engine is launched. The engine runs only for the duration of the slave test case.
Before running the master/slave case, the slaves must be introduced to master. This can be done with command line swith --slave hostname[slave_type]. The hostname (or ip address) is mandatory, if slave type is not given, it defaults to “phone”. It is also possible to configure slaves in min.conf file, or into a file residing in /etc/min.d/ directory.
     [Slaves]
     10.10.1.2 desktop
     maemo laptop
     somehost #defaults to phone
     [End_Slaves]
Note that, if the host name given for slave does not resolve, slave is not added to the pool of slaves. The connection with the slave is formed, when the master test case tries to alloacte slave.
In the MIN script syntax the slave type is defined when allocating the slave, for example allocate desktop slave1. This would allocate first free slave of type “desktop”.
This simple example runs the first case in minDemoModule in two slaves of type “desktop” and “laptop”.
In the min.conf we have specified the slaves as in previous chapter. The master script could then look as follows.
     [Test]
     title run minDemodule in two slaves
     allocate desktop slave1
     remote slave1 run minDemoModule  dummy.cfg 1
     free slave1
     allocate laptop slave2
     remote slave2 run minDemoModule  dummy.cfg 1
     free slave2
     [Endtest]
This chapter describes the MIN Text interface.
MIN Text interface is designed to be used, to handle C strings allocated on the heap, without worrying about the amount of memory needed to be allocated. Text interface can grow or shrink automatically.
MIN Text interface is always allocated on the heap by using tx_create method. It is required by the end user to free all allocated resource by calling tx_destroy on it.
     Text *string = tx_create("MIN");  // allocate Text with "MIN"
                                       // as initializer

     tx_c_append(" is great");         // modification of Text data

     tx_destroy(&string);              // deallocate Text, and buffer
                                       // used to hold string data
Text *tx_create (const char * txt)const char * txt*txt value
void tx_destroy (Text ** txt)Text ** txtvoid tx_append (Text * dest, const Text * src)Text * destconst Text * src*dest
void tx_copy (Text * dest, const Text * src)Text * destconst Text * srcvoid tx_c_append (Text * dest, const char *src)Text * destconst char *src*dest
void tx_prepend (Text * src, Text * dest)Text * src*dest
Text * destvoid tx_c_prepend (Text * src, const char * dest)Text * srcconst char * dest*src
tx_c_copy (Text * dest, const char *src)Text * destconst char *src*dest
char *tx_get_buf (Text * txt)Text * txtchar *tx_share_buf (Text * txt)Text * txtvoid tx_back_trim (Text * txt, const char *chars)Text * txtconst char *charschar tx_at (Text * txt, unsigned int index)Text * txtunsigned int indexindex position
If index exceeds the length of the data NULL byte is returned
tx_int_append (Text * dest, const char *options, int src)Text * destconst char *optionsModifiers are the same as in printf (for more details see man printf)
int srcThe following chapter describes functionality and usage of MIN's Test Interference.
Test interference allows programmers to execute test cases in system under stress - for some components it might be useful to see, how the code behaves if the CPU is busy, when other processes are eating up memory and so on. To simulate system load, MIN uses tools contained in sp-stress package, which is a part of Maemo SDK. Tools can simulate: cpu load, memory usage and IO operations. Test interference is usable in "coded" ("hardcoded", MINUnit and so on), as well as in scripted test cases. Tools from sp-stress package are executed in process running in parallel to test case.
To use test interference, it is mandatory to have sp-stress package installed. Lack of the package will make scripted cases, that use test interference, invalid. In case of "coded" test cases - user needs to check explicitly if creation of test interference succeeded.
MIN provides a set of C functions, that make it possible to use test interference functionality in the same way as other MIN facilities.
Function that creates test interference "instance" and starts the interference process. By "instance" we understand testInterference structure. Pointer to this structure is returned by ti_start_interference function, and is used for manipulating created interference process (pausing/resuming and stopping). When function returns, test interference process is started. As argument, function takes enumerator TInterferenceType, and value of load. TinterferenceType enumerator has the following values:
     typedef enum {
             ECpuLoad,
             EMemLoad,
             EIOLoad
     } TInterferenceType;
Enumerator (along with all test interference functions) is available if file includes the header min_test_interference.h.
Function has the following prototype:
     testInterference *ti_start_interference (TInterferenceType aType,
                                                    int aLoadValue
                                                   );
and should be used in following way:
     testInterference* disturbance;
     disturbance = ti_start_interference(ECpuLoad, 75);
In case of EcpuLoad, load value holds amount of CPU time that should be taken, in percent. In case of EmemLoad, aLoadValue holds amount of memory to be taken, in megabytes. In case of IOLoad (which performs disk IO operations), this value is ignored. It should be also noted, that if it is not possible to create test interference (for any reason, including missing sp-stress package), function will return NULL. More detailed problem information can then be found in syslog.
If there is need to make more complicated interference scenario (for example, to mimic "normal" device usage to some extent), ti_start_interference_timed function might be used. This causes generated disturbance to start and stop in specified time intervals, until stopped permanently. Function has the following prototype:
     testInterference *ti_start_interference_timed (TInterferenceType aType,
                                                    int aIdleTime,
                                                    int aBusyTime,
                                                    int aLoadValue
                                                   );
And should be used in the following way:
     testInterference* disturbance;
     disturbance = ti_start_interference_timed(EMemLoad,10000,10000,99);
This will cause interference process to take 99 megabytes of memory for 10000 milliseconds(10 seconds), then release it for 10 seconds, and repeat cycle until interference is stopped. aIdleTime argument specifies the time during which interference process is stopped. aBusyTime holds amount of time the interference is actually causing the disturbance. Both time values are specified in milliseconds. Return value of function follows the same rules as ti_start_interference.
Function is used to pause test interference process at any moment. It has the following prototype:
void ti_pause_interference(testInterference* aInterference);
and can be used in the following way:
ti_pause_interference(disturbance);
aInterference argument is pointer to testInterference structure, returned by ti_start_interference or ti_start_interference_timed function.
Function is used to resume previously paused interference process. If the process was not paused, call is ignored.
Function has the following prototype:
void ti_resume_interference(testInterference* aInterference);
and can be used in the following way:
ti_pause_interference(disturbance);
aInterference argument is pointer to testInterference structure.
Function used to stop and destroy previously created testInterference. Function has the following prototype:
void ti_stop_interference(testInterference* aInterference);
and can be used in the following way:
ti_stop_interference(disturbance);
aInterference argument is a pointer to testInterference structure, and after function returns, it will be set to NULL. Interference process will be killed. Memory taken for test interference data will be freed.
Test Interference can be also used in scripted test cases, by scripter commands. New keyword, testinterference is used for that. Starting interference is done in the following way:
testinterference name command type value idle_time busy_time
testinterference - mandatory keyword
name - identifier of created testinterference
command - can have two values, "start" or "stop"
type - can have the following values: "cpuload", "memload" and "ioload". Determines type of started interference.
value - numeric parameter, for cpuload determines amount of taken CPU time in percent. For memload it holds amount of taken memory in megabytes. For ioload value is ignored.
idle_time - numeric parameter, specifies time in cycle when disturbance is stopped (in milliseconds). Giving it value 0 is equal to starting constant disturbance.
busy_time - numeric parameter, time the disturbance is active during cycle.
All numeric parameters are mandatory ( due to way parameters are handled in scripter).
Failure to call "stop" command for all "started" interferences in test case will make the case invalid.
It is possible to use C++ inside MIN test modules. Currently (since version 2009w24) a version of Test Module Template Wizard, which creates C++ enabled test module templates, is shipped with MIN. The tool is invoked with command createtestmodule++ and has exactly the same use as the traditional wizard (createtestmodule).
MIN DBus interface allows external clients to interact with MIN through DBus subsystem. All functionalities that are available in MIN are in through DBus thus one can implement a fully functional MIN client interface in one of the programming or scripting language which has DBus bindings, for example: Python. MIN exposes methods that can be called by external clients as well as it uses signals to communicate back with the external client. Exposed methods:
min_add_test_module
min_add_test_case_file
min_start_case
min_pause_case
min_resume_case
min_abort_case
min_query_test_modules
min_query_test_files
min_add_test_module (const char *path)const char *pathmin_add_test_case_file (unsigned int moduleid, const char *testcasefile)unsigned int moduleid.const char *testcasefilemin_start_case (unsigned int moduleid, unsigned int caseid, unsigned int groupid)unsigned int moduleidunsigned int caseididunsigned int groupidmin_pause_case (long testrunid)long testrunidmin_resume_case (long testrunid)long testrunidmin_abort_case (long testrunid)long testrunidmin_query_test_modulesmin_query_test_filesExposed signals:
min_test_modules
min_test_files
min_add_test_case_file
min_start_case
min_pause_case
min_resume_case
min_abort_case
min_query_test_modules
min_query_test_files
min_test_modules (const char *modules)const char *modulesmin_test_files (const char *files)const char *filesmin_new_module (const char *modulename, unsigned int moduleid)const char *modulenameunisgned int moduleidmin_no_module (const char *modulename)const char *modulenamemin_module_ready (unsigned int moduleid)unsigned int moduleidmin_new_test_case (unsigned int moduleid, unsigned int caseid, const char *casetitle)unsigned int moduleidunsigned int caseidconst char *casetitlemin_case_started (unsigned int mosuleid, unsigned int caseid, long testrunid)unsigned int moduleidunsigned int caseidlong testrunidmin_case_paused (long testrunid)long testrunidmin_case_resumed (long testrunid)long testrunidmin_case_result (long testrund, int result, const char *desc, long startime, long endtime)long testrunidint resultconst char *desclong starttimelong endtimemin_case_msg (long testrunid, const char *messagelong testrunidconst char *messageGNU Free Documentation License
Version 1.2, November 2002
Copyright (C) 2000,2001,2002 Free Software Foundation, Inc.
51 Franklin St, Fifth Floor, Boston, MA 02110-1301 USA
Everyone is permitted to copy and distribute verbatim copies
of this license document, but changing it is not allowed.
0. PREAMBLE
The purpose of this License is to make a manual, textbook, or other
functional and useful document "free" in the sense of freedom: to
assure everyone the effective freedom to copy and redistribute it,
with or without modifying it, either commercially or noncommercially.
Secondarily, this License preserves for the author and publisher a way
to get credit for their work, while not being considered responsible
for modifications made by others.
This License is a kind of "copyleft", which means that derivative
works of the document must themselves be free in the same sense. It
complements the GNU General Public License, which is a copyleft
license designed for free software.
We have designed this License in order to use it for manuals for free
software, because free software needs free documentation: a free
program should come with manuals providing the same freedoms that the
software does. But this License is not limited to software manuals;
it can be used for any textual work, regardless of subject matter or
whether it is published as a printed book. We recommend this License
principally for works whose purpose is instruction or reference.
1. APPLICABILITY AND DEFINITIONS
This License applies to any manual or other work, in any medium, that
contains a notice placed by the copyright holder saying it can be
distributed under the terms of this License. Such a notice grants a
world-wide, royalty-free license, unlimited in duration, to use that
work under the conditions stated herein. The "Document", below,
refers to any such manual or work. Any member of the public is a
licensee, and is addressed as "you". You accept the license if you
copy, modify or distribute the work in a way requiring permission
under copyright law.
A "Modified Version" of the Document means any work containing the
Document or a portion of it, either copied verbatim, or with
modifications and/or translated into another language.
A "Secondary Section" is a named appendix or a front-matter section of
the Document that deals exclusively with the relationship of the
publishers or authors of the Document to the Document's overall subject
(or to related matters) and contains nothing that could fall directly
within that overall subject. (Thus, if the Document is in part a
textbook of mathematics, a Secondary Section may not explain any
mathematics.) The relationship could be a matter of historical
connection with the subject or with related matters, or of legal,
commercial, philosophical, ethical or political position regarding
them.
The "Invariant Sections" are certain Secondary Sections whose titles
are designated, as being those of Invariant Sections, in the notice
that says that the Document is released under this License. If a
section does not fit the above definition of Secondary then it is not
allowed to be designated as Invariant. The Document may contain zero
Invariant Sections. If the Document does not identify any Invariant
Sections then there are none.
The "Cover Texts" are certain short passages of text that are listed,
as Front-Cover Texts or Back-Cover Texts, in the notice that says that
the Document is released under this License. A Front-Cover Text may
be at most 5 words, and a Back-Cover Text may be at most 25 words.
A "Transparent" copy of the Document means a machine-readable copy,
represented in a format whose specification is available to the
general public, that is suitable for revising the document
straightforwardly with generic text editors or (for images composed of
pixels) generic paint programs or (for drawings) some widely available
drawing editor, and that is suitable for input to text formatters or
for automatic translation to a variety of formats suitable for input
to text formatters. A copy made in an otherwise Transparent file
format whose markup, or absence of markup, has been arranged to thwart
or discourage subsequent modification by readers is not Transparent.
An image format is not Transparent if used for any substantial amount
of text. A copy that is not "Transparent" is called "Opaque".
Examples of suitable formats for Transparent copies include plain
ASCII without markup, Texinfo input format, LaTeX input format, SGML
or XML using a publicly available DTD, and standard-conforming simple
HTML, PostScript or PDF designed for human modification. Examples of
transparent image formats include PNG, XCF and JPG. Opaque formats
include proprietary formats that can be read and edited only by
proprietary word processors, SGML or XML for which the DTD and/or
processing tools are not generally available, and the
machine-generated HTML, PostScript or PDF produced by some word
processors for output purposes only.
The "Title Page" means, for a printed book, the title page itself,
plus such following pages as are needed to hold, legibly, the material
this License requires to appear in the title page. For works in
formats which do not have any title page as such, "Title Page" means
the text near the most prominent appearance of the work's title,
preceding the beginning of the body of the text.
A section "Entitled XYZ" means a named subunit of the Document whose
title either is precisely XYZ or contains XYZ in parentheses following
text that translates XYZ in another language. (Here XYZ stands for a
specific section name mentioned below, such as "Acknowledgements",
"Dedications", "Endorsements", or "History".) To "Preserve the Title"
of such a section when you modify the Document means that it remains a
section "Entitled XYZ" according to this definition.
The Document may include Warranty Disclaimers next to the notice which
states that this License applies to the Document. These Warranty
Disclaimers are considered to be included by reference in this
License, but only as regards disclaiming warranties: any other
implication that these Warranty Disclaimers may have is void and has
no effect on the meaning of this License.
2. VERBATIM COPYING
You may copy and distribute the Document in any medium, either
commercially or noncommercially, provided that this License, the
copyright notices, and the license notice saying this License applies
to the Document are reproduced in all copies, and that you add no other
conditions whatsoever to those of this License. You may not use
technical measures to obstruct or control the reading or further
copying of the copies you make or distribute. However, you may accept
compensation in exchange for copies. If you distribute a large enough
number of copies you must also follow the conditions in section 3.
You may also lend copies, under the same conditions stated above, and
you may publicly display copies.
3. COPYING IN QUANTITY
If you publish printed copies (or copies in media that commonly have
printed covers) of the Document, numbering more than 100, and the
Document's license notice requires Cover Texts, you must enclose the
copies in covers that carry, clearly and legibly, all these Cover
Texts: Front-Cover Texts on the front cover, and Back-Cover Texts on
the back cover. Both covers must also clearly and legibly identify
you as the publisher of these copies. The front cover must present
the full title with all words of the title equally prominent and
visible. You may add other material on the covers in addition.
Copying with changes limited to the covers, as long as they preserve
the title of the Document and satisfy these conditions, can be treated
as verbatim copying in other respects.
If the required texts for either cover are too voluminous to fit
legibly, you should put the first ones listed (as many as fit
reasonably) on the actual cover, and continue the rest onto adjacent
pages.
If you publish or distribute Opaque copies of the Document numbering
more than 100, you must either include a machine-readable Transparent
copy along with each Opaque copy, or state in or with each Opaque copy
a computer-network location from which the general network-using
public has access to download using public-standard network protocols
a complete Transparent copy of the Document, free of added material.
If you use the latter option, you must take reasonably prudent steps,
when you begin distribution of Opaque copies in quantity, to ensure
that this Transparent copy will remain thus accessible at the stated
location until at least one year after the last time you distribute an
Opaque copy (directly or through your agents or retailers) of that
edition to the public.
It is requested, but not required, that you contact the authors of the
Document well before redistributing any large number of copies, to give
them a chance to provide you with an updated version of the Document.
4. MODIFICATIONS
You may copy and distribute a Modified Version of the Document under
the conditions of sections 2 and 3 above, provided that you release
the Modified Version under precisely this License, with the Modified
Version filling the role of the Document, thus licensing distribution
and modification of the Modified Version to whoever possesses a copy
of it. In addition, you must do these things in the Modified Version:
A. Use in the Title Page (and on the covers, if any) a title distinct
from that of the Document, and from those of previous versions
(which should, if there were any, be listed in the History section
of the Document). You may use the same title as a previous version
if the original publisher of that version gives permission.
B. List on the Title Page, as authors, one or more persons or entities
responsible for authorship of the modifications in the Modified
Version, together with at least five of the principal authors of the
Document (all of its principal authors, if it has fewer than five),
unless they release you from this requirement.
C. State on the Title page the name of the publisher of the
Modified Version, as the publisher.
D. Preserve all the copyright notices of the Document.
E. Add an appropriate copyright notice for your modifications
adjacent to the other copyright notices.
F. Include, immediately after the copyright notices, a license notice
giving the public permission to use the Modified Version under the
terms of this License, in the form shown in the Addendum below.
G. Preserve in that license notice the full lists of Invariant Sections
and required Cover Texts given in the Document's license notice.
H. Include an unaltered copy of this License.
I. Preserve the section Entitled "History", Preserve its Title, and add
to it an item stating at least the title, year, new authors, and
publisher of the Modified Version as given on the Title Page. If
there is no section Entitled "History" in the Document, create one
stating the title, year, authors, and publisher of the Document as
given on its Title Page, then add an item describing the Modified
Version as stated in the previous sentence.
J. Preserve the network location, if any, given in the Document for
public access to a Transparent copy of the Document, and likewise
the network locations given in the Document for previous versions
it was based on. These may be placed in the "History" section.
You may omit a network location for a work that was published at
least four years before the Document itself, or if the original
publisher of the version it refers to gives permission.
K. For any section Entitled "Acknowledgements" or "Dedications",
Preserve the Title of the section, and preserve in the section all
the substance and tone of each of the contributor acknowledgements
and/or dedications given therein.
L. Preserve all the Invariant Sections of the Document,
unaltered in their text and in their titles. Section numbers
or the equivalent are not considered part of the section titles.
M. Delete any section Entitled "Endorsements". Such a section
may not be included in the Modified Version.
N. Do not retitle any existing section to be Entitled "Endorsements"
or to conflict in title with any Invariant Section.
O. Preserve any Warranty Disclaimers.
If the Modified Version includes new front-matter sections or
appendices that qualify as Secondary Sections and contain no material
copied from the Document, you may at your option designate some or all
of these sections as invariant. To do this, add their titles to the
list of Invariant Sections in the Modified Version's license notice.
These titles must be distinct from any other section titles.
You may add a section Entitled "Endorsements", provided it contains
nothing but endorsements of your Modified Version by various
parties--for example, statements of peer review or that the text has
been approved by an organization as the authoritative definition of a
standard.
You may add a passage of up to five words as a Front-Cover Text, and a
passage of up to 25 words as a Back-Cover Text, to the end of the list
of Cover Texts in the Modified Version. Only one passage of
Front-Cover Text and one of Back-Cover Text may be added by (or
through arrangements made by) any one entity. If the Document already
includes a cover text for the same cover, previously added by you or
by arrangement made by the same entity you are acting on behalf of,
you may not add another; but you may replace the old one, on explicit
permission from the previous publisher that added the old one.
The author(s) and publisher(s) of the Document do not by this License
give permission to use their names for publicity for or to assert or
imply endorsement of any Modified Version.
5. COMBINING DOCUMENTS
You may combine the Document with other documents released under this
License, under the terms defined in section 4 above for modified
versions, provided that you include in the combination all of the
Invariant Sections of all of the original documents, unmodified, and
list them all as Invariant Sections of your combined work in its
license notice, and that you preserve all their Warranty Disclaimers.
The combined work need only contain one copy of this License, and
multiple identical Invariant Sections may be replaced with a single
copy. If there are multiple Invariant Sections with the same name but
different contents, make the title of each such section unique by
adding at the end of it, in parentheses, the name of the original
author or publisher of that section if known, or else a unique number.
Make the same adjustment to the section titles in the list of
Invariant Sections in the license notice of the combined work.
In the combination, you must combine any sections Entitled "History"
in the various original documents, forming one section Entitled
"History"; likewise combine any sections Entitled "Acknowledgements",
and any sections Entitled "Dedications". You must delete all sections
Entitled "Endorsements".
6. COLLECTIONS OF DOCUMENTS
You may make a collection consisting of the Document and other documents
released under this License, and replace the individual copies of this
License in the various documents with a single copy that is included in
the collection, provided that you follow the rules of this License for
verbatim copying of each of the documents in all other respects.
You may extract a single document from such a collection, and distribute
it individually under this License, provided you insert a copy of this
License into the extracted document, and follow this License in all
other respects regarding verbatim copying of that document.
7. AGGREGATION WITH INDEPENDENT WORKS
A compilation of the Document or its derivatives with other separate
and independent documents or works, in or on a volume of a storage or
distribution medium, is called an "aggregate" if the copyright
resulting from the compilation is not used to limit the legal rights
of the compilation's users beyond what the individual works permit.
When the Document is included in an aggregate, this License does not
apply to the other works in the aggregate which are not themselves
derivative works of the Document.
If the Cover Text requirement of section 3 is applicable to these
copies of the Document, then if the Document is less than one half of
the entire aggregate, the Document's Cover Texts may be placed on
covers that bracket the Document within the aggregate, or the
electronic equivalent of covers if the Document is in electronic form.
Otherwise they must appear on printed covers that bracket the whole
aggregate.
8. TRANSLATION
Translation is considered a kind of modification, so you may
distribute translations of the Document under the terms of section 4.
Replacing Invariant Sections with translations requires special
permission from their copyright holders, but you may include
translations of some or all Invariant Sections in addition to the
original versions of these Invariant Sections. You may include a
translation of this License, and all the license notices in the
Document, and any Warranty Disclaimers, provided that you also include
the original English version of this License and the original versions
of those notices and disclaimers. In case of a disagreement between
the translation and the original version of this License or a notice
or disclaimer, the original version will prevail.
If a section in the Document is Entitled "Acknowledgements",
"Dedications", or "History", the requirement (section 4) to Preserve
its Title (section 1) will typically require changing the actual
title.
9. TERMINATION
You may not copy, modify, sublicense, or distribute the Document except
as expressly provided for under this License. Any other attempt to
copy, modify, sublicense or distribute the Document is void, and will
automatically terminate your rights under this License. However,
parties who have received copies, or rights, from you under this
License will not have their licenses terminated so long as such
parties remain in full compliance.
10. FUTURE REVISIONS OF THIS LICENSE
The Free Software Foundation may publish new, revised versions
of the GNU Free Documentation License from time to time. Such new
versions will be similar in spirit to the present version, but may
differ in detail to address new problems or concerns. See
http://www.gnu.org/copyleft/.
Each version of the License is given a distinguishing version number.
If the Document specifies that a particular numbered version of this
License "or any later version" applies to it, you have the option of
following the terms and conditions either of that specified version or
of any later version that has been published (not as a draft) by the
Free Software Foundation. If the Document does not specify a version
number of this License, you may choose any version ever published (not
as a draft) by the Free Software Foundation.
ADDENDUM: How to use this License for your documents
To use this License in a document you have written, include a copy of
the License in the document and put the following copyright and
license notices just after the title page:
Copyright (c) YEAR YOUR NAME.
Permission is granted to copy, distribute and/or modify this document
under the terms of the GNU Free Documentation License, Version 1.2
or any later version published by the Free Software Foundation;
with no Invariant Sections, no Front-Cover Texts, and no Back-Cover
Texts.
A copy of the license is included in the section entitled "GNU
Free Documentation License".
If you have Invariant Sections, Front-Cover Texts and Back-Cover Texts,
replace the "with...Texts." line with this:
with the Invariant Sections being LIST THEIR TITLES, with the
Front-Cover Texts being LIST, and with the Back-Cover Texts being LIST.
If you have Invariant Sections without Cover Texts, or some other
combination of the three, merge those two alternatives to suit the
situation.
If your document contains nontrivial examples of program code, we
recommend releasing these examples in parallel under your choice of
free software license, such as the GNU General Public License,
to permit their use in free software.